A quick and simple sample project that will demonstrate how to setup Android fragments and navigate between them. Will walk through initial project setup, necessary dependencies, setup of 3 different fragments with navigation between them using jetpack and Androidx.
Initial Project Setup
In Android Studio create a new project with just an empty activity. Let Gradle sync and then build the project to make sure no weird compilation errors pop up; its rare but happens. Once that is complete and the project is in a good state, create a second empty activity this is the activity that will house our FragmentContainerView.
In this example the Fragments will be housed in the ‘FragmentHolder‘ activity with the corresponding ‘activity_fragmentholder.xml‘ layout file. The fragments will be housed inside of an existing activity (this is a bit confusing but will make sense soon). Project should look something like this:

Once an activity has been created that will house the Fragments add the ‘androidx.fragment.app.FragmentContainerView’ attribute to the activities layout file like below.
<?xml version="1.0" encoding="utf-8"?>
<androidx.constraintlayout.widget.ConstraintLayout xmlns:android="http://schemas.android.com/apk/res/android"
    xmlns:app="http://schemas.android.com/apk/res-auto"
    xmlns:tools="http://schemas.android.com/tools"
    android:layout_width="match_parent"
    android:layout_height="match_parent"
    tools:context=".FragmentHolder">

    <TextView
        android:id="@+id/textView"
        android:layout_width="wrap_content"
        android:layout_height="wrap_content"
        android:text="@string/txt_fragment"
        app:layout_constraintBottom_toBottomOf="parent"
        app:layout_constraintEnd_toEndOf="parent"
        app:layout_constraintStart_toStartOf="parent"
        app:layout_constraintTop_toTopOf="parent"
        app:layout_constraintVertical_bias="0.057" />
    <androidx.fragment.app.FragmentContainerView
        android:id="@+id/fragment_container_view"
        android:layout_width="match_parent"
        android:layout_height="match_parent"
        />
</androidx.constraintlayout.widget.ConstraintLayout>
Its a good idea to build at this step, so you know you are in a good state. The next step involves adding some dependencies that might break the build if there are any version mismatches between the current project and the additional dependencies.
Navigation Dependencies
Need to add two different dependencies to the build.gradle file
- androidx.navigation:navigation-fragment:<version>
- androidx.navigation:navigation-ui:<version>
The version that is being used in this project is 2.2.2 for both the dependencies listed above.
dependencies {

    implementation 'androidx.appcompat:appcompat:1.4.1'
    implementation 'com.google.android.material:material:1.1.0'
    implementation 'androidx.constraintlayout:constraintlayout:2.1.4'
    implementation 'androidx.navigation:navigation-fragment:2.2.2'
    implementation 'androidx.navigation:navigation-ui:2.2.2'
    testImplementation 'junit:junit:4.+'
    androidTestImplementation 'androidx.test.ext:junit:1.1.1'
    androidTestImplementation 'androidx.test.espresso:espresso-core:3.4.0'
}
In case you run into any build errors below is both the project and module Gradle files so if there are any version mismatches you know which versions are being used in this example.
build.gradle (Project)
// Top-level build file where you can add configuration options common to all sub-projects/modules.
buildscript {
    repositories {
        google()
        jcenter()
    }
    dependencies {
        classpath "com.android.tools.build:gradle:4.1.1"

        // NOTE: Do not place your application dependencies here; they belong
        // in the individual module build.gradle files
    }
}

allprojects {
    repositories {
        google()
        jcenter()
    }
}

task clean(type: Delete) {
    delete rootProject.buildDir
}
build.gradle (Module)
plugins {
    id 'com.android.application'
}

android {
    compileSdkVersion 31

    defaultConfig {
        applicationId "com.st.android_fragment"
        minSdkVersion 28
        targetSdkVersion 30
        versionCode 1
        versionName "1.0"

        testInstrumentationRunner "androidx.test.runner.AndroidJUnitRunner"
    }

    buildTypes {
        release {
            minifyEnabled false
            proguardFiles getDefaultProguardFile('proguard-android-optimize.txt'), 'proguard-rules.pro'
        }
    }
    compileOptions {
        sourceCompatibility JavaVersion.VERSION_1_8
        targetCompatibility JavaVersion.VERSION_1_8
    }
}

dependencies {

    implementation 'androidx.appcompat:appcompat:1.4.1'
    implementation 'com.google.android.material:material:1.1.0'
    implementation 'androidx.constraintlayout:constraintlayout:2.1.4'
    implementation 'androidx.navigation:navigation-fragment:2.2.2'
    implementation 'androidx.navigation:navigation-ui:2.2.2'
    implementation 'androidx.legacy:legacy-support-v4:1.0.0'
    testImplementation 'junit:junit:4.+'
    androidTestImplementation 'androidx.test.ext:junit:1.1.1'
    androidTestImplementation 'androidx.test.espresso:espresso-core:3.4.0'
}
Create a Navigation Resource File
The navigation file will store all the different actions that link the different fragments. It will also store what fragments are available to navigate to.
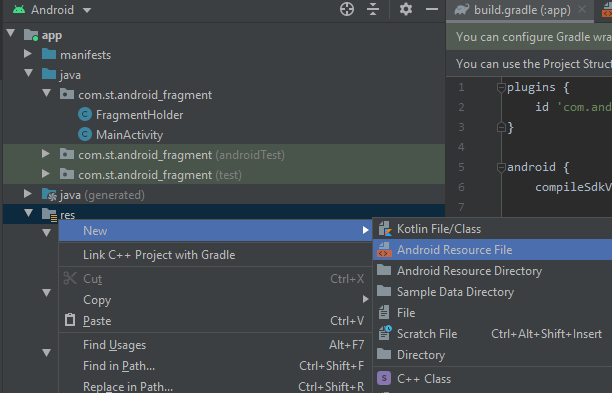
In Android Studio right click on the ‘res‘ folder hover over ‘new‘ then select ‘Android Resource File‘

In the popup select Navigation from the Resource Type dropdown menu, then fill in a file name.


Here I called the file ‘nav_graph‘ click OK and Android Studio will create a new folder under the ‘res‘ folder called ‘navigation‘ under that folder you will see your file.

There should not be really any contents in the new navigation file except for the empty navigation element seen below.
<?xml version="1.0" encoding="utf-8"?>
<navigation xmlns:android="http://schemas.android.com/apk/res/android"
    xmlns:app="http://schemas.android.com/apk/res-auto" android:id="@+id/nav_graph">

</navigation>
Now we need to add a fragment or two so we can wire up the navigation using the ‘nav_graph‘ file.
Creating a Fragment and Rendering it
First create a class that extends the Fragment class and override a few key methods. In this example I’m going to create a class called ‘MainFragment’ that will be our initial fragment rendered. You will need to override the ‘onCreateView’ method and return the inflated view of your fragment layout. Example code below:
package com.st.android_fragment;

import android.os.Bundle;
import android.util.Log;
import android.view.LayoutInflater;
import android.view.View;
import android.view.ViewGroup;

import androidx.fragment.app.Fragment;

public class MainFragment extends Fragment {

    @Override
    public View onCreateView(LayoutInflater inflater, ViewGroup container, Bundle savedInstance){
        Log.e(MainActivity.LOG_KEY, "Fragment called");
        return inflater.inflate(R.layout.fragment_main, container, false);

    }

    @Override
    public void onViewCreated(View view, Bundle savedInstanceState) {
        super.onViewCreated(view,savedInstanceState);
        //this is where we are going to wire up buttons to go to the next fragment.
    }
}
Now that the class has been created we need to create the layout file, in your Android Studio project right click on ‘layout‘ folder under ‘res‘ and select new -> Layout Resource File. The naming convention for layout files is to use the top level component name at the beginning then the name of the fragment. In this case the fragment name is ‘Main‘ so we get a layout file called ‘fragment_main.xml‘. Up to you if you want to put anything inside of the layout file but probably a good idea to at least but a button or text view with some text so you know its working.

Next its time to fill out the details of the fragment in the Navigation file (nav_graph.xml). Add the fragment element to the file along with ‘app:startDestination’ and ‘xmlns:tools’ attributes added to the navigation element. Updated file below.
<?xml version="1.0" encoding="utf-8"?>
<navigation xmlns:android="http://schemas.android.com/apk/res/android"
    xmlns:app="http://schemas.android.com/apk/res-auto"
    android:id="@+id/nav_graph"
    xmlns:tools="http://schemas.android.com/tools"
    app:startDestination="@id/MainFragment">

    <fragment
        android:id="@+id/MainFragment"
        android:name="com.st.android_fragment.MainFragment"
        android:label="Main Fragment"
        tools:layout="@layout/fragment_main"></fragment>

</navigation>
Finally, need to tie the navigation graph to the FragmentContainerView. To do this the ‘android:name’ and ‘app:navGraph’ properties need to be added to FragmentContainerView element in the layout file that is tied to the housing activity (activity_fragmentholder.xml for this example). The two new properties can be seen below.
<?xml version="1.0" encoding="utf-8"?>
<androidx.constraintlayout.widget.ConstraintLayout xmlns:android="http://schemas.android.com/apk/res/android"
    xmlns:app="http://schemas.android.com/apk/res-auto"
    xmlns:tools="http://schemas.android.com/tools"
    android:layout_width="match_parent"
    android:layout_height="match_parent"
    tools:context=".FragmentHolder">

    <TextView
        android:id="@+id/textView"
        android:layout_width="wrap_content"
        android:layout_height="wrap_content"
        android:text="@string/txt_fragment"
        app:layout_constraintBottom_toBottomOf="parent"
        app:layout_constraintEnd_toEndOf="parent"
        app:layout_constraintStart_toStartOf="parent"
        app:layout_constraintTop_toTopOf="parent"
        app:layout_constraintVertical_bias="0.057" />
    <androidx.fragment.app.FragmentContainerView
        android:id="@+id/fragment_container_view"
        android:layout_width="match_parent"
        android:layout_height="match_parent"
        android:name="androidx.navigation.fragment.NavHostFragment"
        app:navGraph="@navigation/nav_graph"
        />
</androidx.constraintlayout.widget.ConstraintLayout>
Adding More Fragments and Wiring up the Navigation
Lets add two more fragments with layouts and get them added into the navigation file. To create the additional fragments I’m going to be doing the same steps as I did above. The project layout and code will be listed below.
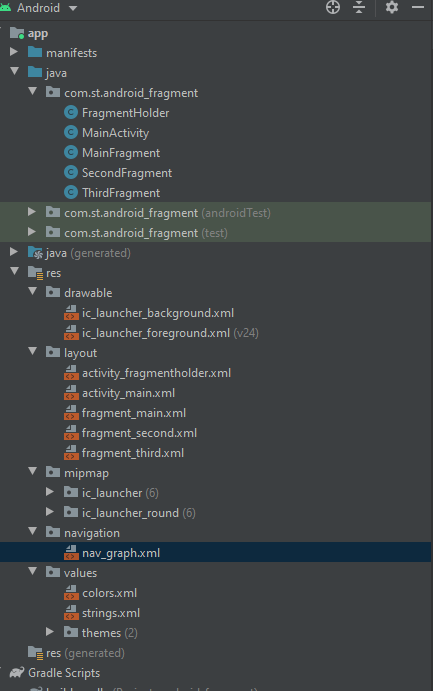
Project Layout

Files that were added were the SecondFragment and ThirdFragment java files with their corresponding layout files. They have just the two overridden methods in both of them.
Fragment Code
public class SecondFragment extends Fragment {

    @Override
    public View onCreateView(LayoutInflater inflater, ViewGroup container,
                             Bundle savedInstanceState) {
        return inflater.inflate(R.layout.fragment_second, container, false);
    }

    @Override
    public void onViewCreated(@NonNull View view, Bundle savedInstanceState) {
        super.onViewCreated(view, savedInstanceState);

    }
}


public class ThirdFragment extends Fragment {

    @Override
    public View onCreateView(LayoutInflater inflater, ViewGroup container,
                             Bundle savedInstanceState) {
        return inflater.inflate(R.layout.fragment_third, container, false);
    }

    @Override
    public void onViewCreated(@NonNull View view, Bundle savedInstanceState) {
        super.onViewCreated(view, savedInstanceState);


    }
}
At this point the layout files do not have anything in them yet so I’m not going to show them. The next step will be to get the fragments added the the ‘nav_graph.xml‘. To do that you can just copy what was done for the MainFragment but using different names and ids example of file is below.
<?xml version="1.0" encoding="utf-8"?>
<navigation xmlns:android="http://schemas.android.com/apk/res/android"
    xmlns:app="http://schemas.android.com/apk/res-auto"
    android:id="@+id/nav_graph"
    xmlns:tools="http://schemas.android.com/tools"
    app:startDestination="@id/MainFragment">

    <fragment
        android:id="@+id/MainFragment"
        android:name="com.st.android_fragment.MainFragment"
        android:label="Main Fragment"
        tools:layout="@layout/fragment_main">
    </fragment>

    <fragment
        android:id="@+id/SecondFragment"
        android:name="com.st.android_fragment.SecondFragment"
        android:label="Second Fragment"
        tools:layout="@layout/fragment_second">
    </fragment>

    <fragment
        android:id="@+id/ThridFragment"
        android:name="com.st.android_fragment.ThirdFragment"
        android:label="Third Fragment"
        tools:layout="@layout/fragment_third">
    </fragment>

</navigation>
Okay so at this point you should be able to click over to the Design view for the ‘nav_graph.xml’ file in Android Studio and see three different fragments, note they could be stacked on top of one another so you might have to drag them apart. Now for the cool part, instead of manually adding the actions in the nav file you can just draw the connections and Android Studio will auto fill in the actions xml.

In the picture above you can see the connections that have been drawn and if we take a look at the nav file now we will see the actions populated.
<?xml version="1.0" encoding="utf-8"?>
<navigation xmlns:android="http://schemas.android.com/apk/res/android"
    xmlns:app="http://schemas.android.com/apk/res-auto"
    android:id="@+id/nav_graph"
    xmlns:tools="http://schemas.android.com/tools"
    app:startDestination="@id/MainFragment">

    <fragment
        android:id="@+id/MainFragment"
        android:name="com.st.android_fragment.MainFragment"
        android:label="Main Fragment"
        tools:layout="@layout/fragment_main">
        <action
            android:id="@+id/action_MainFragment_to_SecondFragment"
            app:destination="@id/SecondFragment" />
        <action
            android:id="@+id/action_MainFragment_to_ThridFragment"
            app:destination="@id/ThridFragment" />
    </fragment>

    <fragment
        android:id="@+id/SecondFragment"
        android:name="com.st.android_fragment.SecondFragment"
        android:label="Second Fragment"
        tools:layout="@layout/fragment_second">
        <action
            android:id="@+id/action_SecondFragment_to_ThridFragment"
            app:destination="@id/ThridFragment" />
    </fragment>

    <fragment
        android:id="@+id/ThridFragment"
        android:name="com.st.android_fragment.ThirdFragment"
        android:label="Third Fragment"
        tools:layout="@layout/fragment_third">
        <action
            android:id="@+id/action_ThridFragment_to_MainFragment"
            app:destination="@id/MainFragment" />
    </fragment>

</navigation>
Getting Basic Navigation Working
Okay the basic setup is in place now its time to actually be able to navigate between different the different fragments. In order to accomplish this need to grab a reference to the NavController class. This can be accomplished by referencing NavHostFragment and passing a reference to the current fragment into findNavController. See the highlighted line below for an example
package com.st.android_fragment;

import android.os.Bundle;
import android.view.LayoutInflater;
import android.view.View;
import android.view.ViewGroup;

import androidx.annotation.NonNull;
import androidx.fragment.app.Fragment;
import androidx.navigation.NavController;
import androidx.navigation.fragment.NavHostFragment;

public class ThirdFragment extends Fragment {

    @Override
    public View onCreateView(LayoutInflater inflater, ViewGroup container,
                             Bundle savedInstanceState) {
        return inflater.inflate(R.layout.fragment_third, container, false);
    }

    @Override
    public void onViewCreated(@NonNull View view, Bundle savedInstanceState) {
        super.onViewCreated(view, savedInstanceState);

        NavController navController = NavHostFragment.findNavController(ThirdFragment.this);

        view.findViewById(R.id.button5).setOnClickListener((view1) -> {
            navController.navigate(R.id.action_ThridFragment_to_MainFragment);
        });


    }
}
We also need to tell the NavController when to navigate to the next fragment and what fragment to navigate to. For this example just a simple button press will suffice as the trigger. However, in order for the NavController to know where to go it needs an action. This is accomplished by passing it a reference id to one of the actions that was setup in the nav_graph.xml file.
The fragment definition from the nav_graph.xml file containing the action.
    <fragment
        android:id="@+id/ThridFragment"
        android:name="com.st.android_fragment.ThirdFragment"
        android:label="Third Fragment"
        tools:layout="@layout/fragment_third">
        <action
            android:id="@+id/action_ThridFragment_to_MainFragment"
            app:destination="@id/MainFragment" />
    </fragment>
The resource id for the action being passed into the navigate method on the navController.
        view.findViewById(R.id.button5).setOnClickListener((view1) -> {
            navController.navigate(R.id.action_ThridFragment_to_MainFragment);
        });
The other fragments will need to be wired up as well, full code for all of them can bee seen below.
MainFragment
package com.st.android_fragment;

import android.content.Context;
import android.os.Bundle;
import android.util.Log;
import android.view.LayoutInflater;
import android.view.View;
import android.view.ViewGroup;
import android.widget.EditText;

import androidx.annotation.NonNull;
import androidx.fragment.app.Fragment;
import androidx.navigation.NavController;
import androidx.navigation.NavHostController;
import androidx.navigation.fragment.NavHostFragment;

public class MainFragment extends Fragment {

    @Override
    public View onCreateView(LayoutInflater inflater, ViewGroup container, Bundle savedInstance){
        Log.e(MainActivity.LOG_KEY, "Fragment called");
        return inflater.inflate(R.layout.fragment_main, container, false);

    }

    @Override
    public void onViewCreated(View view, Bundle savedInstanceState) {
        super.onViewCreated(view,savedInstanceState);
        //this is where we are going to wire up buttons to go to the next fragment.

        NavController navController = NavHostFragment.findNavController(this);

        view.findViewById(R.id.button2).setOnClickListener(view1 -> {
            navController.navigate(R.id.action_MainFragment_to_SecondFragment);
        });

        view.findViewById(R.id.button3).setOnClickListener(view1 -> {
            navController.navigate(R.id.action_MainFragment_to_ThridFragment);
        });
    }
}
SecondFragment
package com.st.android_fragment;

import android.os.Bundle;
import android.view.LayoutInflater;
import android.view.View;
import android.view.ViewGroup;

import androidx.annotation.NonNull;
import androidx.fragment.app.Fragment;
import androidx.navigation.NavController;
import androidx.navigation.fragment.NavHostFragment;

public class SecondFragment extends Fragment {

    @Override
    public View onCreateView(LayoutInflater inflater, ViewGroup container,
                             Bundle savedInstanceState) {
        return inflater.inflate(R.layout.fragment_second, container, false);
    }

    @Override
    public void onViewCreated(@NonNull View view, Bundle savedInstanceState) {
        super.onViewCreated(view, savedInstanceState);

        NavController navController = NavHostFragment.findNavController(SecondFragment.this);

        view.findViewById(R.id.button4).setOnClickListener((view1) -> {
            navController.navigate(R.id.action_SecondFragment_to_ThridFragment);
        });

    }
}
ThridFragment
package com.st.android_fragment;

import android.os.Bundle;
import android.view.LayoutInflater;
import android.view.View;
import android.view.ViewGroup;

import androidx.annotation.NonNull;
import androidx.fragment.app.Fragment;
import androidx.navigation.NavController;
import androidx.navigation.fragment.NavHostFragment;

public class ThirdFragment extends Fragment {

    @Override
    public View onCreateView(LayoutInflater inflater, ViewGroup container,
                             Bundle savedInstanceState) {
        return inflater.inflate(R.layout.fragment_third, container, false);
    }

    @Override
    public void onViewCreated(@NonNull View view, Bundle savedInstanceState) {
        super.onViewCreated(view, savedInstanceState);

        NavController navController = NavHostFragment.findNavController(ThirdFragment.this);

        view.findViewById(R.id.button5).setOnClickListener((view1) -> {
            navController.navigate(R.id.action_ThridFragment_to_MainFragment);
        });


    }
}
That is it, at this point you should have a simple app with three different fragments that can you can navigate to. Below is a video of the different fragments, I added some additional color to help visually identify the different fragments. Cheers!